How To: Block Unwanted IPs with uTorrent’s Hidden Blocking Feature and Blocklist Manager

Categories: Featured, Guides, Tools

utorrentuTorrent – a popular BitTorrent client for Windows – has a little-known IP blocking feature which can help protect you from unwanted observation by anti-P2P organizations or government institutions.  The easiest way to block unwanted IPs is to download and install PeerGuardian 2, but this software only works well in Windows XP so Windows Vista and Windows 7 users should follow this guide instead.

This guide will show you how to use a program called Blocklist Manager to retrieve and compile a list of all unwanted IPs, then use uTorrent’s built-in blocking feature to block them.  Don’t worry about the length of the procedure, most of these steps only have to be performed once.

It should be noted that while blocking IPs can help hide your BitTorrent usage, it is not perfect and the absolute best method for staying safe is to avoid downloading copyrighted material.

Procedure

  1. Open uTorrent and click Options –> Preferences.
  2. Click Advanced and locate the entry ipfilter.enable and make sure it is set to true.  Close uTorrent.
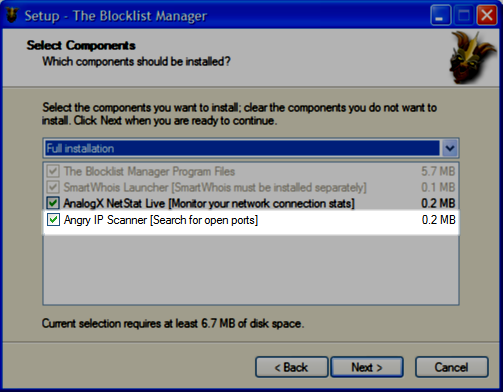
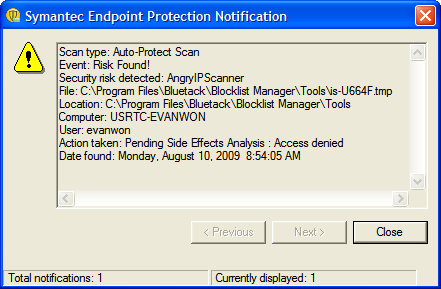
    blockips_utorrent_settings
  3. Download and install Blocklist ManagerNote:  During installation, your virus scanner may warn you about an application called Win32/Angryscan.A.  This software is optionally included with Blocklist Manager (and can be disabled during installation), but I do not consider it to be harmful.
  4. Open Blocklist Manager and click the Sources button to download a directory of sources (Note: this does not actually download the block lists, just the directory of lists).
    blockips_blm_sources_button
  5. Click Tools –> Options.
    blockips_blm_options
  6. Click Sources and enable any IP lists you would like to be protected from.  I chose to block all lists except for the Non-LAN List, but the Level 1 and Level 2 lists would probably be sufficient for most users.  Click OK.
    blockips_blm_sources
  7. Click the Process button to start downloading and compiling any IP lists you selected.  This may take some time, so be patient while it processes the files.
    blockips_blm_process
  8. Once the processing is finished, click Export –> Export Manager.  This is where you will tell the program where to save your newly created block list so uTorrent can load it.
    blockips_blm_exportmanager
  9. Use the following settings (also shown in the image below):
    1. Name: ipfilter.dat
    2. Format: eMule/Donk
    3. Location: (Note: You may need to enable viewing hidden folders for this step)
      1. Windows XP: Click ‘Browse Local’ and navigate to C:\Documents and Settings\<USERNAME>\Application Data\uTorrent
        1. Note: you may need to enter ipfilter.dat in the File Name box if you encounter problems exporting the file later.
      2. Windows Vista/7: Click ‘Browse Local’ and navigate to C:\Users\<USERNAME>\AppData\Roaming\uTorrent
        1. Note: you may need to enter ipfilter.dat in the File Name box if you encounter problems exporting the file later.
    4. Check the ‘Export Location Active‘ box and click Add.  Click OK.
      blockips_blm_export
  10. In the main program again, click the Export List button.  This will save the block list to the uTorrent folder you set in the previous step.
    blockips_blm_export_button
  11. If prompted about overwriting an existing file, click Yes.
    blockips_utorrent_overwrite
  12. Once the export process has finished, verify that no errors occurred in the command area of the program.  If none, your block list was successfully saved to the uTorrent folder.
    blockips_blm_success
  13. Open uTorrent and click the Logger tab (as shown below).  If you see a message stating that ipfilter.dat (# of entries) was loaded, everything worked properly!
    blockips_utorrent_loades

It is very important to update your ipfilter.dat file regularly to get the most recent block lists.  To do this, download the updated IP lists and export them by repeating Step 7 and Step 10 above, then restart uTorrent to load the new list.

About the Author

Evan Wondrasek is the founding editor of Techerator and is a software engineer in Minneapolis, MN. Evan recently graduated from the University of North Dakota with degrees in Electrical Engineering and Computer Science, and enjoys web design, vanilla lattes, and all things tech.

Related Posts

Comments

  1. Reis Pritchard Jun 15, 2009

    I load and update ipfilter.dat a different way that is easier for me…but this way works great too. Good guide.

    Here's the link for the updater I use. http://tinyurl.com/knqdma

    • Reis Pritchard Jun 16, 2009

      After clicking the tinyurl link use the search box below the anti-leeching text and type in "ipfilter.dat" and click on the first link that shows up. It will take you to the post with the download link for the updater with instructions.

      • EurekaMan Aug 10, 2009

        Yeah, good guide. Thanks for the link.

  2. mr t Jul 8, 2009

    thank you for this guide, everything worked well, i just hope the blockers do they're job

  3. aedosen Aug 9, 2009

    The blocklist manager contains malware/spyware called “angryscan” that tries to install when you download the program.

    • Evan Wondrasek Aug 10, 2009

      Angryscan (or Angry IP Scanner) is somewhat mislabeled as malware/spyware. This program is used to scan IP ranges (which can be used for security testing or malicious purposes), so certain companies consider it to be "malware".

      From Microsoft:
      "Tool:Win32/Angryscan.A is a tool used to 'sniff' for or gather information sent over a network by a specific IP address range."

      Angryscan does not allow an intruder to scan your computer, it in fact lets you scan others' computers. It is included with Blocklist Manager as a 'feature' but it can be disabled during installation as shown in this image: http://www.techerator.com/wp-content/uploads/angr...

      If you have already installed Angry IP Scanner unintentionally, it will not harm your computer. If you are concerned, remove Blocklist Manager under Start –> Control Panel –> Add or Remove Programs –> BLM and reinstall it with the Angry IP Scanner feature unchecked.

      (For the record, my Symantec also thinks it is malware: http://www.techerator.com/wp-content/uploads/angr... )

  4. Unfortunately Aug 18, 2009

    Aww, I was excited for Blocklist, but it apparently but does not in Windows 7 64bit.

    • Josh Nov 3, 2009

      It does work, because i am using it now

  5. StickyR Oct 16, 2009

    Excellent guide mate,
    cheers!

  6. Jimmy Oct 27, 2009

    I would really be interested in a way to schedule the tasks to run automatically, is this possible?

    FYI: It works fine for me in Win7 Ultimate 64bit. I've also used it successfully on Vista Ultimate 64bit and Vista Business 32bit.

  7. Ronald Nov 6, 2009

    Hello;

    I worked thru all the steps and receive this error when I got to step 13.

    [2009-11-05 18:10:58] IPv6 is installed
    [2009-11-05 18:10:58] Got Teredo Address: 2001:0:4137:9e50:2c79:2c6a:e75f:b0ab
    [2009-11-05 18:10:58] Torrent storage folder can't be the same as the autoload folder!

  8. hview Nov 8, 2009

    Excellent guide mate

  9. Dee Nov 13, 2009

    I followed the steps listed and received this error:
    :: Error in WriteFile: Path/File access error, file=C:Users…..AppDataRoaminguTorrent
    But I checked utorrent and it was showing up in the logger tab, I also hit "clear logger" which I apparently shouldn't have done. Does this mean I undid everything, or just that it's not viewable?
    What do I do to make it show up again?

    • Evan Wondrasek Jan 12, 2010

      Clear logger will just clear any error messages, so any problems that occur should still show up next time you open the program.

      Double check the file path you set in Step 9, it looks like that is the source of the error you saw.

  10. Guest Jan 12, 2010

    Hi. Thanks for the awesome guide. Only thing which stumped me was in step 8: "click Tools –> Export –> Export Manager" should really be "click Export –> Export Manager", like in the screen shot!

    • Evan Wondrasek Jan 12, 2010

      Good catch! Thanks for letting me know, I fixed it now :)

  11. Nat Jan 26, 2010

    quick question, do you need to have blocklist manager always running?

  12. Evan Wondrasek Jan 26, 2010

    Hi Nat,

    Once you've followed the entire guide you will no longer need to keep Blocklist Manager running. All of the blocked IP addresses will be stored in ipfilter.dat which uTorrent uses.

    Make sure to update the blocklist often though to keep the filters up-to-date.

  13. Aethera Jan 29, 2010

    Thanks for these instructions – I also had the problem with the Export List step causing the error “Error in WriteFile: Path/File access error” under Windows 7. Here is the mistake I made – I thought that in the export manager that the path should be set to the AppData directory for uTorrent. It was not clear to me that the various blocklists from Blocklist Manager all get exported to a file in AppData/Roaming/uTorrent which *must* be named ipfilter.dat (I know you mention this but I missed this step – you might want to mention specifically that this name must be created, that all the blocklists get exported into this one file).
    Blocklist Manager is a really cool app and I’m extremely glad I found it after the UAC issues with running PeerGuardian under Win7.
    Thanks again Evan for your excellent article!

  14. Jason Jan 29, 2010

    Thanks man. Best guide I've found on this. Much appreciated!

  15. Brian Feb 22, 2010

    Here's a tip so you can autoupdate your lists on launch. Go to Options -> Personal Sources -> Edit Exports button. Now select Add. Input whatever you want to the autoexport name field, select export type as eMule/Donk, and then input C:Users"user name"AppData[Roaming]uTorrent. Make sure it's saved as ipfilter.dat obviously.

    Once that is done go back to the main Options menu and under General (default Options tab) select Download on startup (I also enabled Shutdown when done and Start Minimized in Tray for my own convenience – it will only ask you to rewrite the ipfilter.dat file in this hidden process, which it would do regardless if these options were enabled).

    I have also created a batch file to autoupdate the lists and then launch uTorrent. This means every time I want to use uTorrent my lists are sure to be up to date! Here is what it looks like. Just change your uTorrent shortcut to (I dropped it in my uTorrent folder). You can also run it minimized by selecting Run: Minimzed to make it nearly autonomous. It should be pretty easy to figure out how to shorten the timer as well – but be sure to give Blocklist Manager a decent amount of time to update the list.

    @echo Launching and updating Blocklist Manager lists.
    @echo Waiting 60 seconds for list update to complete and user to confirm list rewrite.
    @echo off
    start "" "C:Program Files (x86)BluetackBlocklist ManagerBlockMgr.exe"

    ping -n 2 127.0.0.1>nul
    ping -n 2 127.0.0.1>nul
    ping -n 2 127.0.0.1>nul
    ping -n 2 127.0.0.1>nul
    ping -n 2 127.0.0.1>nul
    @echo Waiting 55 seconds
    ping -n 2 127.0.0.1>nul
    ping -n 2 127.0.0.1>nul
    ping -n 2 127.0.0.1>nul
    ping -n 2 127.0.0.1>nul
    ping -n 2 127.0.0.1>nul
    @echo 50 seconds
    @echo off
    ping -n 2 127.0.0.1>nul
    ping -n 2 127.0.0.1>nul
    ping -n 2 127.0.0.1>nul
    ping -n 2 127.0.0.1>nul
    ping -n 2 127.0.0.1>nul
    @echo 45 seconds
    @echo off
    ping -n 2 127.0.0.1>nul
    ping -n 2 127.0.0.1>nul
    ping -n 2 127.0.0.1>nul
    ping -n 2 127.0.0.1>nul
    ping -n 2 127.0.0.1>nul
    @echo 40 seconds
    @echo off
    ping -n 2 127.0.0.1>nul
    ping -n 2 127.0.0.1>nul
    ping -n 2 127.0.0.1>nul
    ping -n 2 127.0.0.1>nul
    ping -n 2 127.0.0.1>nul
    @echo 35 seconds
    ping -n 2 127.0.0.1>nul
    ping -n 2 127.0.0.1>nul
    ping -n 2 127.0.0.1>nul
    ping -n 2 127.0.0.1>nul
    ping -n 2 127.0.0.1>nul
    ping -n 2 127.0.0.1>nul
    @echo 30 seconds
    @echo off
    ping -n 2 127.0.0.1>nul
    ping -n 2 127.0.0.1>nul
    ping -n 2 127.0.0.1>nul
    ping -n 2 127.0.0.1>nul
    ping -n 2 127.0.0.1>nul
    @echo 25 seconds
    @echo off
    ping -n 2 127.0.0.1>nul
    ping -n 2 127.0.0.1>nul
    ping -n 2 127.0.0.1>nul
    ping -n 2 127.0.0.1>nul
    ping -n 2 127.0.0.1>nul
    @echo 20 seconds
    ping -n 2 127.0.0.1>nul
    ping -n 2 127.0.0.1>nul
    ping -n 2 127.0.0.1>nul
    ping -n 2 127.0.0.1>nul
    ping -n 2 127.0.0.1>nul
    @echo 15 seconds
    @echo off
    ping -n 2 127.0.0.1>nul
    ping -n 2 127.0.0.1>nul
    ping -n 2 127.0.0.1>nul
    ping -n 2 127.0.0.1>nul
    ping -n 2 127.0.0.1>nul
    @echo 10 seconds
    @echo off
    ping -n 2 127.0.0.1>nul
    ping -n 2 127.0.0.1>nul
    ping -n 2 127.0.0.1>nul
    ping -n 2 127.0.0.1>nul
    ping -n 2 127.0.0.1>nul
    @echo 5 seconds
    @echo off
    ping -n 2 127.0.0.1>nul
    @echo 4 seconds
    ping -n 2 127.0.0.1>nul
    @echo 3 seconds
    ping -n 2 127.0.0.1>nul
    @echo 2 seconds
    ping -n 2 127.0.0.1>nul
    @echo 1 second!
    ping -n 2 127.0.0.1>nul

    start "" "C:Program Files (x86)uTorrentuTorrent.exe"

  16. bobby Mar 8, 2010

    i did that and it came with one error count and this guide doesnt tell what to do if you get error count 1 after u export list number 10 11 and 12

    • Evan Wondrasek Mar 8, 2010

      Hi Bobby,

      Could you please post the full error you receive and also any extra details? I can help troubleshoot the problem.

    • Evan Wondrasek Mar 8, 2010

      Please note that "error count 1" isn't an actual error message, it just displays the total number of errors encountered. You may have to scroll up through the log to locate the original error.

  17. DVL Mar 17, 2010

    Hi Brian, great tip. Thanks,

    I added Blocklist manager into my "All Users" Startup group to auto update on Windows startup.

    I had to set the following options also to get the list to update and export without prompting.
    (Under Options/General/Processing)
    Select the following;
    >Auto Export Selected
    Deselect the following
    >Enable Export Warning.
    This allows the ipfliter.dat to be overwritten without prompting for confirmation.

Trackbacks

There are no trackbacks on this entry.

blog comments powered by Disqus