
 It’s likely that at some point in time, you will either sell your computer or install a new operating system on your current machine. In either situation, it’s recommended that you wipe your hard drive clean of any and all information.
Most people will tell you to format your computer because it deletes everything from the hard drive, but while formatting does in fact remove information and prepare your hard drive for something new, it doesn’t completely remove traces of your private information.
If you only plan on upgrading your current Windows installation (i.e. Windows XP to Windows 7), then formatting your hard drive will certainly do the trick. If you want a more thorough clean, however, you should consider the open-source application DBAN (Darik’s Boot and Nuke) as an alternative.
Warning: DBAN will erase ALL data on your hard drive(s). Do not attempt this unless you have a backup of any important data!
When To Use DBAN
When you format a hard drive it deletes all your information, but it does not securely delete that info by overwriting it like DBAN does. DBAN uses the Department of Defense 5220.22-M secure data erasing algorithm to overwrite all your files three times. This is the grade of security the government trusts to destroy classified data and prevents all known techniques of hard disk forensic analysis, so anybody looking to spy on your information will be left without a trace to follow.
If you are just going to throw away a computer and think that taking a hammer to your old hard drive is a good idea, you should think again. A snoop with a certain level of technical knowledge could still recover sensitive information from the partially ruined drive, and possibly steal your identity.
How To Use DBAN
Using DBAN is easy: Visit the Darik’s Boot and Nuke website and download the stable release for CD and DVD media. Once you’ve downloaded it, use your burning program of choice to write the ISO file to the disc.
When the burning process is complete, put the DBAN disc in your optical drive and restart your computer. Most modern computers will boot to the optical drive by default, but if not you will need to change this setting in your BIOS.
DBAN will begin running with a blue screen and a warning message about the usage and a few erasing options. Below the warning and options you will see text that reads ‘boot:’
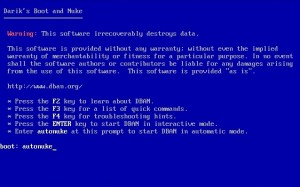
The safe and easy way to run DBAN is by typing “autonuke” (without the quotations – as seen above) after the ‘boot:’ prompt to begin running the program and wiping any hard drives that are part of your computer. Keep in mind that the larger the hard drive, the longer the wiping process will take.
If the DBAN completed successfully, you will get a success message after the program has finished. You can eject the disc and strike the power button to power off the machine.
Congratulations! Your computer has now been cleaned and is ready for a new owner, operating system, or the trash. You can feel confident that nobody will be able to recover your sensitive information from that hard drive in the future.
Have you tried DBAN or an alternative to wipe your hard drive? Let us know your opinions in the comments below!
Leave a Reply
You must be logged in to post a comment.